
Before We Begin: A Few Important Disclaimers
First things first, make sure you are applying for the correct student visa for your specific program. This guide is intended as a general overview of the Spanish student visa process, but requirements can vary depending on your consulate and individual circumstances. I also want to emphasize that every Spanish consulate operates a little differently. To familiarize yourself with the Spanish Consulate you’ll be working with, click here.
If you are applying through ConversaSpain, RVF International, MEDDEAS, or any other language assistant program, please note that requirements may differ. Always double-check with your specific program and the official consulate or visa provider to make sure you are following the correct and most up-to-date information for your situation.
Also, make sure your VPN is turned off when accessing these links. In some cases, having a VPN enabled can prevent certain websites or documents from loading properly or may block access altogether.
NALCAP Requirements
Boston Consulate Requirements | Chicago Consulate Requirements | Houston Consulate Requirements | Los Angeles Consulate Requirements | Miami Consulate Requirements | New York City Consulate Requirements | San Francisco Consulate Requirements | Washington D.C. Consulate Requirements | Puerto Rico Consulate Requirements
BEDA Requirements
Boston Consulate Requirements | Chicago Consulate Requirements | Houston Consulate Requirements | Los Angeles Consulate Requirements | Miami Consulate Requirements | New York City Consulate Requirements | San Francisco Consulate Requirements | Washington D.C. Consulate Requirements | Puerto Rico Consulate Requirements
For example, I was incredibly fortunate with the Houston consulate. I didn’t have to schedule an in-person appointment. Instead, I was able to mail my application and receive my visa by mail once approved. However, many consulates require appointments, and some can be booked out weeks or even months in advance. If your consulate requires an appointment, make sure you schedule it as soon as possible.
Another important update is that Spanish immigration laws recently changed. Student visa applications must now be submitted at least two months before your program start date. For example:
- My BEDA program begins on September 7th, so I need to submit my visa application before July 7th.
- Most NALCAP participants begin on October 1st, which means applications should be submitted before August 1st.
Whatever the start date, just apply the 2-month rule. Always double-check your dates against your carta de nombramiento or acceptance letter. Now let’s get into the process.
Step 1: Receive Your Acceptance Into the Program
Once you’ve officially been accepted into your program, congratulations! Take a moment to celebrate because the paperwork marathon is about to begin. Your acceptance letter is one of the most important documents in your visa application. You won’t receive your carta de nombramiento until later, but as soon as you accept your position, move on to Step 2.
Step 2: Request Your FBI Background Check
If you’re applying from the United States and your stay will exceed 180 days, you’ll need an FBI background check. The process works like this:
- Submit your request online through the FBI and click “Obtaining Your Identity History Summary.” Once you submit your info, the FBI emails you a PIN, a tracking link, and access to your application. Save that email like your life depends on it. You’ll use it again and again.
- Here is the FBI-approved channelers’ list. (If not using USPS)
- If using USPS, here is the registration link.
- Visit an approved fingerprinting location. Use this search feature!
- Submit your fingerprints electronically.
A common misconception is that every post office offers FBI fingerprinting services; they don’t. Make sure you locate an approved fingerprinting center before showing up. In my experience, the FBI background check took approximately 2 to 3 weeks to process, although your timeline may vary. The good news is that you don’t need to wait for a physical copy. The FBI will email you a digital copy, which is sufficient for the next step.
With the fingerprints, you have two options if you’re based in the US:
Option A: Electronic submission (recommended)
- Go to an approved location (often USPS)
- Pay an extra fingerprinting fee ($50)
- Get your prints scanned digitally
This is faster and usually smoother.
Option B: Mail-in fingerprint card
- Print a fingerprint card
- Go to a police station or fingerprinting service
- Mail it physically to the FBI
This works, but it’s slower and honestly more stressful. If you’re doing everything from abroad (Spain), option B is your only option. Check out this blog -> How to Get Your FBI Fingerprints in Spain: (Without Losing Your Mind)
The FBI fee is around $18 for the background check, and then if you do electronic fingerprints, it’s about $50 for scanning at USPS. So yes, it’s not just one payment; it stacks a bit. After payment: Save your confirmation email, save your order number, and don’t assume you’ll “find it later” (you won’t).
You’ll use your FBI order number to book a fingerprinting appointment through USPS or a participating location. Then bring your confirmation email, show up during fingerprinting hours, get scanned, leave, and wait.
-> Helpful YouTube video on how to obtain an FBI background check here!
Step 3: Send Your FBI Background Check for an Apostille
The apostille process was by far the longest part of my visa timeline. Once you receive your FBI background check, send it to Washington, D.C. to receive a Federal Apostille. For me, this process took roughly five weeks. Some people receive theirs faster, others wait longer. Unfortunately, this step is largely a waiting game. While you’re waiting, you can start working on everything else. Here you can find information on the US Dept of State Apostilles and the DS-4194 form to request one.
What you need before anything else
For the apostille, you’ll need a few key things:
- Your original FBI background check
- A DS-4194 form
- A $20 money order or check (made out to the U.S. Department of State)
- Two USPS Priority Mail envelopes with tracking
And yes, it’s two envelopes, not one. This is where people usually get confused.
Step 1: Go to USPS
Even though you can technically look at envelopes online, don’t order them online. Just go in person to USPS and get:
(1) Outbound Envelope: This is the one you use to send everything to the apostille office:
Office of Authentications
U.S. Department of State
CA/PPT/S/TO/AUT
44132 Mercure Circle
P.O. Box 1206
Sterling, VA 20166-1206
Make sure it has tracking. You want to know where this thing is at all times.
(1) Return Envelope: This second envelope is for them to send your apostilled document back to you. You’ll fill it out with:
- your full name
- your correct home address
- everything exactly as it needs to be delivered
Double-check this part. Triple-check it if you’re like me and don’t trust handwriting under pressure. Place the envelope inside the outbound envelope.
Step 2: Fill out the DS-4194 form
This form is basically your request for authentication. Here’s the simple breakdown:
- Section 1: Your personal info
- Section 2: Delivery info + tracking number (from your return envelope)
- Section 3: Leave blank (no representative needed)
- Section 4:
- Country of use: Spain
- Document type: FBI Criminal Background Record
- Number of documents: 1
- Fee: $20
- Section 5: Total cost ($20)
Step 3: Payment
You’ll include a $20 check or money order payable to the U.S. Department of State. Important notes:
- No cash
- No credit cards
- Make sure your name and address are included if required
Step 4: Assemble everything
Now you put it all together: Inside your outbound USPS envelope, include:
- FBI background check
- DS-4194 form
- $20 payment
- your self-addressed return envelope
Make sure the FBI document is clean, readable, and the seal is visible. This is the part where organization really matters. Once it’s gone, it’s gone.
Step 5: Send it and wait
Once you mail it, you can track it, but after that, it becomes a waiting game. If you need status updates, you can call the Office of Authentications at 202-485-8000. Hours are Monday–Friday, 8:00 a.m. to 3:00 p.m. Before calling, it helps to check their online “Document Status” page first, so you’re not calling just to wait on hold for fun. Contact Authentications here!
If you’re in a rush
If you’re dealing with an emergency or a tight timeline, there is one extra option: You can contact your U.S. Congressional representative. Some offices can request expedited processing and help flag your application due to urgent travel timelines. Not all offices respond the same way, but it’s absolutely worth trying if you’re stuck.
-> If you’re a visual learner, here’s a helpful YouTube video on how to obtain an Apostille here!
(…While We Wait)
Step 4: Schedule Your Medical Certificate Appointment
Don’t wait until the last minute. While your apostille is being processed, schedule an appointment with your doctor for your medical certificate. The medical certificate:
- Must be less than three months old
- Must include the doctor’s stamp or official letterhead
- Must certify that you are in good health according to the International Health Regulations
Many consulates provide a template. If yours does, use it. It makes everyone’s life easier. Here is the general medical certificate template, but please be aware that some consulates have their own version with their own letterhead (San Francisco, for example), so please make sure you use the right one!
Step 5: Get Updated Passport Photos
You’ll need passport-style photos for your application. BLS requests a recent color 2” x 2” passport photo. Don’t overthink this. Simply walk into the locations listed below and say you need your passport photo taken. Most people can get these at:
- Walgreens
- CVS
- UPS Store locations
- Local photography studios
Make sure the photos meet Spanish visa requirements.
Step 6: Begin Filling Out Your Visa Application
This is where my Type-A personality came out. I printed multiple copies of the visa application and practiced filling them out before completing the final version. Seriously, I probably went through two or three copies before creating my own template. I noted:
- What fields need information
- What fields should be left blank
- What information is needed to be written exactly as shown on other documents
By the time I completed the final application, I felt much more confident.
This form is one of those steps that looks simple until you’re halfway through it, thinking, “wait… what even goes here?” So here’s how I approached it in a way that kept me from spiraling. You can find the form here (always have both the original and a copy). Please double-check to make sure the application form is for YOUR specific visa and from YOUR consulate!!!
Quick but important formatting note: In Spain and across most of Europe, dates are written as: DD/MM/YYYY, not the U.S. format. This is a small detail, but it’s an easy one to mess up if you’re not paying attention.
Photo requirement
Some consulates require you to physically glue your visa photo into the application. Yes, glue it, don’t staple or tape it. It goes in the box provided on the form, so don’t overthink it, just make it clean, and you can also attach a paperclip in the corner so that it stays glued.
-> If you’re a visual learner, here’s a helpful YouTube video on how to fill out your visa application here!
How I filled out each section
Sections 1–9
This is all your basic personal information. Names, address, nationality, etc. It’s bilingual (Spanish + English), so just take your time and don’t rush through it.
Section 10
If you’re not a minor: Write N/A
Section 11:
N/A
You don’t have a Spanish national ID number yet.
Section 12
Type of travel document: Passport
Section 13–15
- Passport number
- Date issued
- Expiration date
Just a friendly reminder: visas are now typically issued for a full year. So when you receive your passport back with your visa, keep in mind that if your program starts around September or October, your passport will need to remain valid at least until September or October of the following year.
If it doesn’t meet that validity window, it’s a good idea to contact your consulate for clarification. However, in most cases, you may simply need to renew your passport before proceeding. (😵💫)
Section 16
U.S. Department of State
Sections 17–19
More personal details. Just fill them in carefully and match your documents exactly.
Section 20
Studies
Section 21
This is your intended arrival date in Spain. You can list a date slightly earlier than your program start date so you have time to settle in. Some consulates also note that entering as a tourist before your visa start date is allowed for U.S. citizens.
Section 22
MULT
Section 23
Address of your school or regional education office (carta de nombramiento/acceptance letter, etc).
Sections 24–25
If you’ve lived in Spain before and already have a NIE, include it here and include the issuance date if applicable. If not, leave as N/A. Sometimes, they may still ask to see your old passport if you previously had a Spanish visa, just as a reference check.
Sections 26–27
N/A
Section 28
This is where you pull info directly from your carta de nombramiento/acceptance letter, so just match it exactly.
Section 29
N/A
Section 30
- Place (city where you signed the form)
- Date
Section 31
- Your signature
Step 7: Make a Notarized Copy of Your Driver’s License
You’ll need a photocopy of your driver’s license and a notarized certification of that photocopy. I went to my local County Clerk’s Office, although the exact office may vary depending on where you live. Typically, they will:
- Review the photocopy
- Stamp it
- Sign it
- Certify that it is a true copy
***Also, make sure to skip ahead to Step 9, Option 2 if it applies to you, so you can avoid making two separate trips. If you’re using a financial sponsor, be sure to get their sponsorship letter notarized as well.
What is a notarized copy?
A notarized copy is just a photocopy of a document that a notary confirms is a true, unaltered copy of the original. Basically, the notary is saying: “Yes, this copy matches the original. No funny business here.”
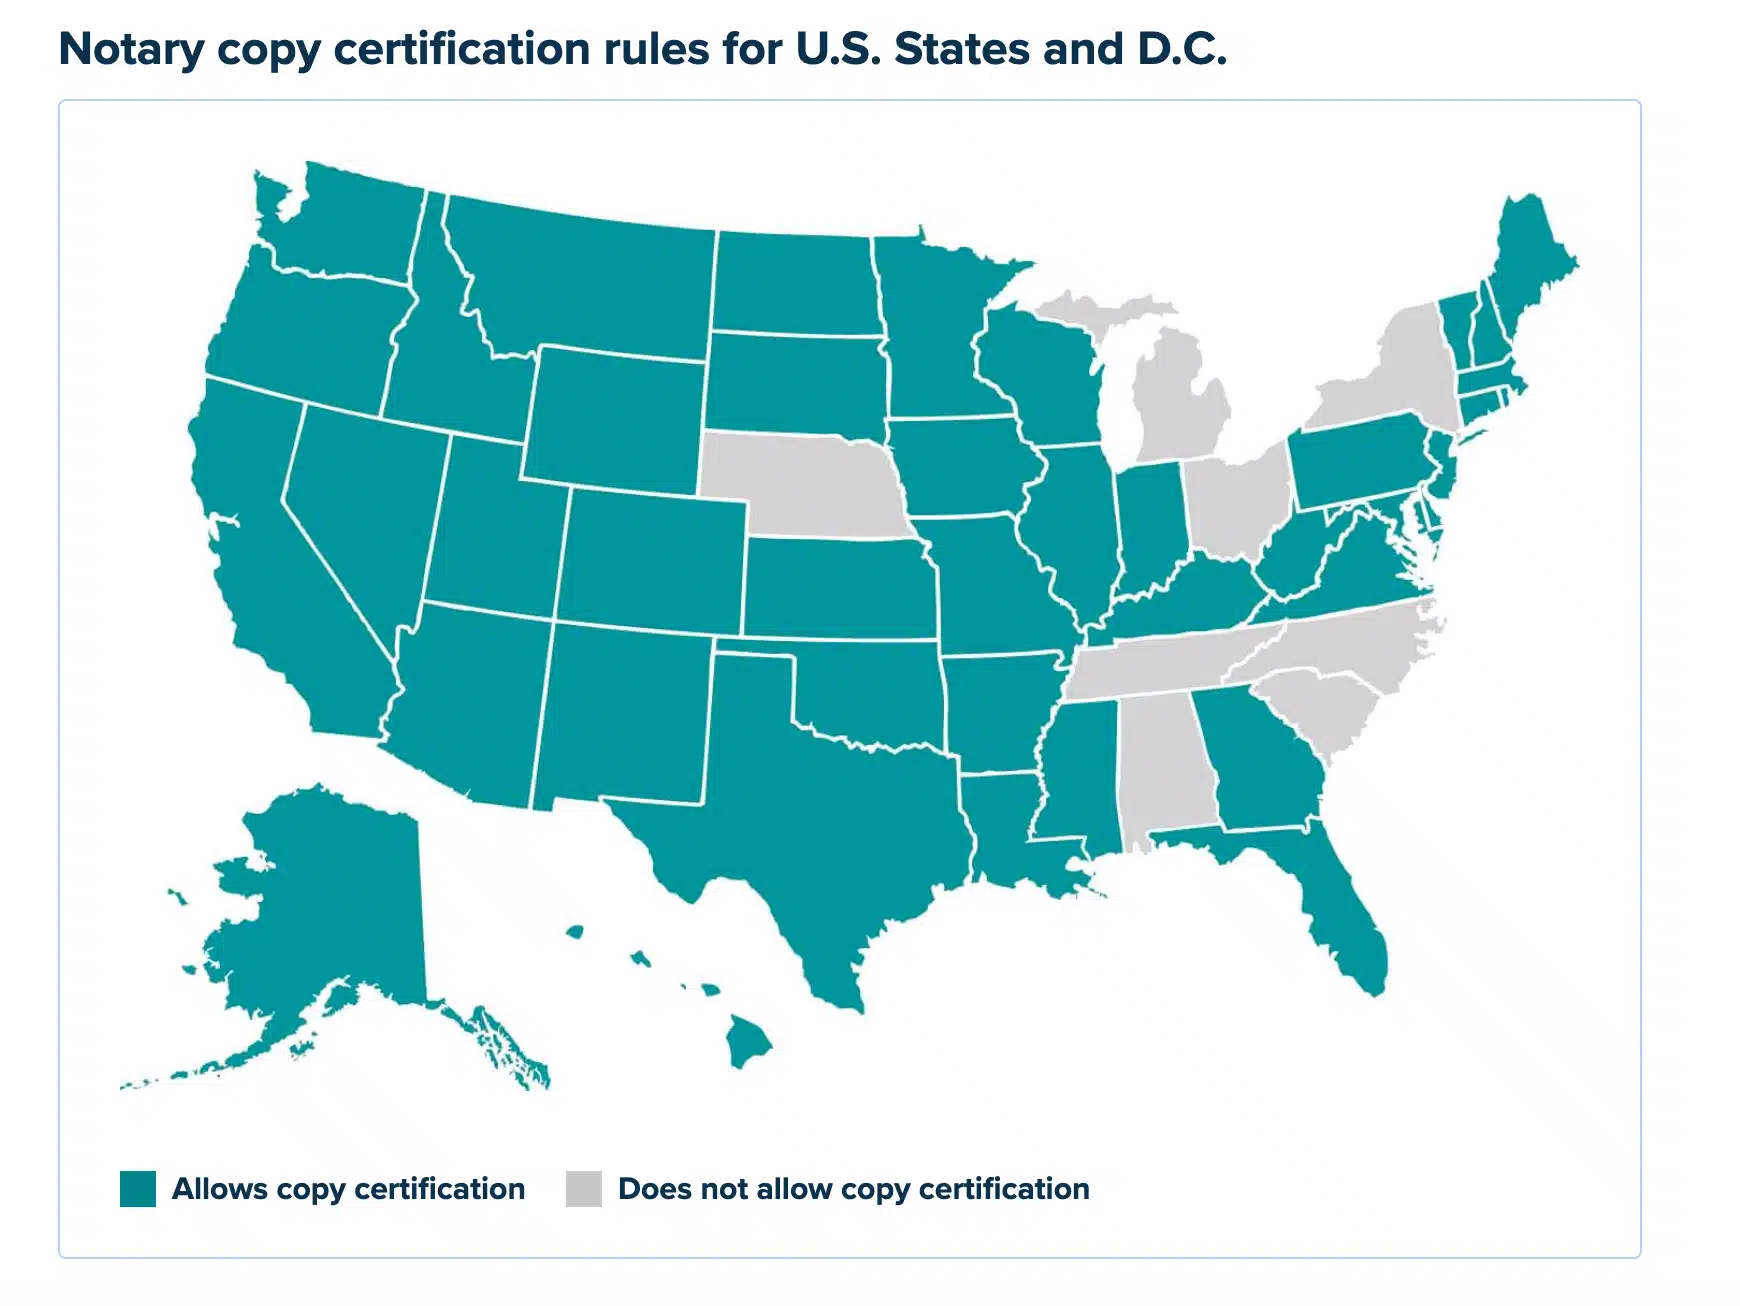
Not every state handles this the same way
Here’s something I didn’t realize at first: not every U.S. state allows notaries to certify copies. Some states allow it easily, others restrict it, and a few (like California) have very specific rules about when it’s allowed. You can check general state rules through the resources here. So, depending on where you live, your process might look slightly different.
Where to actually get it done
In real life, the easiest place to find a notary is usually:
- your bank
- UPS stores (sometimes)
- local notary offices
- shipping/print centers
Pro tip: always call ahead. Not all branches have a notary available every day, and nothing is more annoying than showing up for a “quick signature” that doesn’t exist that day.
What you bring with you
When you go to the notary, bring:
- your original driver’s license
- a clean photocopy of it
- your passport (sometimes they still ask for it)
Sometimes the notary will want to make the copy themselves just to be safe. It depends on the office, so it’s good to ask ahead.
Option 1: If your state allows a copy certification
This is the straightforward version. You simply say: “I need a notarized copy for a visa application.” The notary will verify the original, compare it to the copy, stamp it “TRUE COPY”, sign and seal it, and that’s it.
Option 2: If your state does NOT allow copy certification
This is where it gets slightly more formal. Instead, you may need a sworn statement confirming the copy is accurate. In this case:
- you bring a pre-written statement
- the notary notarizes your signature on that statement
- the statement is attached to your copy
It achieves the same goal, just through a different legal method. To find out how to certify a copy of a document, click here!
Courtesy of: National Notary Association
The notary should certify a copy of a document by writing ‘TRUE COPY’ and putting his/her signature, seal, and stamp preferably on the copy itself. However, if your state law does not permit a copy of the document to be notarized on the face of it, please attach a statement with the following lines:
Pre-Written Statement Template (copy+paste)
State of ___________
County of ___________
On this _______ day of ______________ (month and year), I certify that the preceding or attached document is a true, exact, complete, and unaltered photocopy from the original document of _____________________
(description of document), presented to me by the document’s custodian ________________________________ (name of custodian).
Notary Seal (Signature of Notary)
(Name of Notary Typed, Stamped or Printed)
Notary Public, State of ___________
My commission expires ______________
They may also write this statement on a copy of the document.“I declare this is a true, exact, and unaltered photocopy of xxxxxx.”
Then sign and date this before the notary. The notary will notarize your signature. I remember when I did this, the process was actually pretty simple. The county clerk made a photocopy of my driver’s license, then wrote out the certification directly on the page by hand. She signed it, stamped it, and included a statement confirming it was a true copy.
So it doesn’t necessarily have to be a formal printed letter, although that definitely looks cleaner and more professional. From my own experience, a notary or clerk can also handwrite the certification as long as it includes their signature and official stamp. The key thing is making sure nothing is missing at the end. No signature, no stamp, no validity
(Wait Is Over…)
Step 8: Translate Your Documents
Once your apostilled FBI background check arrives, you’re ready for translations. Generally, you’ll need certified Spanish translations of:
- FBI Background Check
- Apostille
- Medical Certificate
Use a certified translator approved by your consulate. You can find an official translator on the website here, or you can reach out to my personal recommendation instead. She was easy to work with and had a quick turnaround of 24-48 hours. Find her information here -> Elisa Vilches.
If you choose to contact her directly, just send a brief email introducing yourself and explaining what you need translated. She’s very familiar with these programs and the visa process, so she already knows exactly what’s required. All you need to do is send her the documents, and she’ll take care of the rest.
Step 9: Gather Your Financial Documents (if Applicable)
Spain wants proof that you can financially support yourself during your stay. This may include:
Option 1: Personal Financial Documents
- Recent bank statements
- Recent pay stubs
Option 2: Financial Sponsorship
If a parent or legal guardian is sponsoring you, you’ll generally need:
- Notarized financial support letter
- Copies of the sponsor’s ID
- A birth certificate proving the relationship
- Last three months of personal bank statements
Business accounts are generally not accepted. Suggested wording:
“I hereby certify that I, (name of parent or guardian), will support (student name) with a monthly allowance of $700 per month while they are in Spain and that I am financially responsible for any emergency that may arise.”
Step 10: Obtain Health Insurance
This is one area where many applicants get tripped up since it’s a new requirement. Your insurance must:
- Be valid in Spain
- Cover 100% of medical expenses
- Have no deductible
- Have no copays
- Have no coverage limits
- Cover hospitalization and outpatient services
Travel insurance is not accepted. Insurance cards alone are also not accepted. You need an official certificate from the insurance provider. Many (NALCAP) auxiliares choose providers such as Feather Insurance because they offer plans specifically designed for visa applicants.
With BEDA, they provide a health certificate that fulfills the health insurance requirement, so you don’t need to purchase additional insurance. If you haven’t received it before your visa appointment, please reach out to your program coordinators to obtain this information!
Step 11: Print and Organize Everything
Before submitting your application, create a checklist. You’ll typically need:
- Visa application form
- Passport
- Passport-style photos
- Acceptance letter (carta de nombramiento)
- Proof of payment (tuition/program fee, etc.) (if applicable)
- Proof of financial means
- Proof of health insurance
- Health Statement Statutory Declaration
- Medical certificate
- FBI background check
- Apostille
- Certified translations
- Notarized driver’s license copy
- Any required consulate-specific forms
- Money order form
!!!Double-check every requirement against your consulate’s website!!!
Step 12: Submit Your Visa Application
At this point, you’ve done the hard part. Whether you’re:
- Mailing your application
- Using BLS
- Attending an in-person appointment
Review everything one final time before submission. One small mistake can delay processing.
The Spanish visa process can feel overwhelming when you first look at it. Trust me, I know. There were moments when it felt like every document depended on another document, and every step involved waiting. But if you break it down into manageable pieces and start early, it’s completely doable.
My biggest piece of advice: Start with the FBI background check as soon as you receive your acceptance. Everything else tends to fall into place around that timeline. And whatever you do, don’t remove the staples, rivets, seals, or bindings from your apostilled documents. Doing so can invalidate them and create unnecessary headaches. Take a deep breath, stay organized, and remember that every document you complete is one step closer to your life in Spain. You’ve got this!
💃🏻 Resources for Auxiliares
→ Ultimate NALCAP Checklist
→ YouTube Series for new auxiliares
→ Start with my Spain series: Hola España
→ Grab your España essentials: España Essentials
→ All about the auxiliar experience: Auxiliar Abroad
→ Bureaucracy Explained for auxiliares
→ Auxiliar de Conversación links spreadsheet: (Links, Resources, & Discounts)
→ Reddit thread for auxiliares: Spain Auxiliares
→ Facebook group for auxiliares: Auxiliares de Conversación en España
→ WhatsApp Group for Host an Auxiliar
→ Facebook Group for Host an Auxiliar
Love always + good luck,
American Girl Meets World